Go to your campaign and click on “Create notification“. And click on “Request Collector“.
Basics
Title Message
Give your notification a Title by typing in field provided.
Description Message
Give your notification a Description Message by typing in field provided.
Image URL
Leave empty for no image. Hint: icons8.com has a good library of small icons that you can use and it is free.
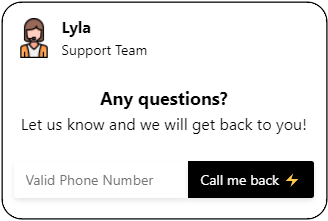
Content Title
The title of your request, ie. How May I Help You?
Input Placeholder
How will you contact them, ie. by phone or email
Button Text
What is your action for the button, ie. Sign me up
Show Agreement
There is an ON or OFF button. Do you want to display a members agreement/privacy policy for your visitors. This also depends on where you live so check obligations in your country. Safest way is to display.
Require the user to confirm his agreement by ticking a checkbox.
This is the small box that the visitor has to check for the members agreement/privacy policy. You should also check regulations for your country.
Agreement Text
What do you want the text to read, ie. I read & agree the Privacy Policy.
Agreement URL
The URL for the agreement once the visitor checks the box to agree.
Triggers
You can leave Trigger on all pages to ON which will show the notification on all of the pages of your website. If you turn it to OFF then you can customize a specific page or pages.
When the trigger is set to OFF you have the option from the drop down menu under:
Display Trigger
- Delay – At what time do you want the notification to start showing to engage the visitor that has entered your site. This starts in seconds and you can type a number or use the scroll arrows to set that time.
- Exit Intent – If the visitor goes to exit your site by closing the browser you can have the notification display to give them a special message or deal for your product or service.
- Scroll Percentage – If the person scrolls down the page you have the option to set the notification to show starting at 5% and up of the scroll bar.
- Display notification once per session – You have the option for ON or OFF -A visitor session is cleared once the browser is closed.
- Display on small screens – You have the option for ON or OFF – Whether or not to display the notification on when pixels available are smaller than 768px.
Display
Display Duration
How many seconds to display the notification or for how long to you want the notification to display. You can type in a number in the field provided or use the scroll arrows. Set -1 to display forever.
Display Position
Where do you want the notification to display on your page for the visitor.
We offer different areas on the page.
You have a Drop down menu for positioning:
- Top Left
- Top Center
- Top Right
- Middle Left
- Middle Center
- Middle Right
- Bottom Left
- Bottom Center
- Bottom Right
Display Close Button
This is if you would like to have an X on the notification for the visitor to close the notification
Display Branding
If you are an Enterprise member you will have your branding (website URL) on the notifications. If you are not an Enterprise member the notification will display our branding (website URL) You have the option to turn this ON or OFF if you have a paid plan..
Customize
You can make changes to the color of the title, description, background, button, and button wording all by just clicking on the color bars and choose the color, and click save. The colors will instantly change.
Border Radius
You can choose from the drop down:
- Straight
- Rounded
- Round
Border Width
Value from 0 to 5 for the border width of the notification.
Border Color
You can change the border color if you chose to have one by clicking on the color bar, choose the color, and click save.
Display Shadow
This is a drop shadow around the notification that shows prominently when the notification background is white.
You can Enable or disable the shadow around the edges of the notification.
Entrance Animation
How do you want the notification to enter on your site.
Choose from the drop down menu:
- Fade In
- Slide In Up
- Slide In Down
- Zoom In
- Bounce In
Exit Animation
How do you want the notification to exit the site.
Choose from the drop down menu:
- Fade Out
- Slide Out Up
- Slide Out Down
- Zoom Out
- Bounce Out
Data
Send caught data to external sources – This is an ON/OFF button
Webhook
A webhook is set up to capture the date for this notification, the email address. How do you want to capture it. The webhook will have the info sent directly to your email provider.
If the webhook is too complicated you can have the visitors email sent to your email address. You just have to put your email in the field provided.